

4 Yoga Poses For Pelvic Floor Strengthing
One major issue women deal with in silence in their later years is a weakened pelvic floor muscles. It almost as if no woman experiences it. But this is not true because there is about 3 million reported cases of women who have a symptom or two relating to pelvic floor weakness of dysfunction.
The pelvic floor consists of layers of muscles, connective tissue , tendons and nerves that forms a hammock at the base of your abdomen. It weakens due to excessive pressure. This can occur with due to pregnancy, childbirth, being overweight, chronic cough and constipation or any activity that exerts constant pressure on the pelvic floor.
You might have pelvic floor weakness if you leak urine when you cough, laugh, sneeze, do any physical activity or even during sex.
If left untreated your weak pelvic floor can cause your uterus, bladder, vagina and rectum to prolapse. Unfortunately, strengthening these muscles requires more than just giving yourself some time off and waiting for it to recover on its own.
However, if you take a pro active approach you can prevent prolapse. One technique many women use is gentle Yoga.
Performing pelvic floor exercises and/ or yoga is one of the best ways to strengthen the pelvic floor and help your pelvic floor regain its strength.
But, you can’t just do any yoga. In fact, some might make it worse. If you are already practicing yoga, you might have to make adjustments in your flow.
You might not know how to engage your pelvic floor muscles or you might feel shy to talk about it. The first thing you can do is to talk to your gynecologists. He/She will be able to test your pelvic floor strength.
Since the pelvic muscles reside in the part of our body that we are culturally conditioned to consider as a taboo topic, many women fail to learn how to properly train their pelvic muscles which results in them getting increasingly weaker over time.
If you have ever been pregnant, have kids back to back, overweight or engage in activities that cause pressure on your pelvic floor, as your connective tissue looses strength due to aging, you will most likely develop a prolapse.
To add fuel to the fire, having your uterus remove can also shift the remaining organs in your pelvic region which in turn can lead to a prolapse vagina, bladder, intestine, or rectum.
To keep your pelvic floor muscles elastic and toned you should avoid straining. This include also when having a bowel movement. In addition, you should use proper lifting technique when necessary, and prepare your body for pregnancy pre, ante and post partum.
Unless you have a high risk pregnancy, you should be able to participate in an exercise program that is gentle. You should avoid activities that places excess pressure on your pelvic floor. This is where yoga can help because it’s very low impact.
Creating a good, simple base should always be the first step you take towards learning any type of new exercise, including exercises for pelvic floor muscle strengthening. Start simple by creating a routine that consists of engaging and relaxing your pelvic floor muscles.
It will take some time for you to learn how to do it properly, but it is important that you learn how to do these exercises properly and purposefully, to avoid hurting yourself or making the condition worse; you can talk to a physician or yoga instructor, or someone who has experience and knowledge in this area if it is your first time doing these exercises.
How To Find Your Pelvic Floor Muscles With Crocodile Pose
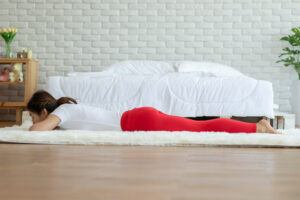
Start by laying on your stomach and as you deep breathe in and out feel your pelvic area rise and fall.
Step 1: Lie down, face and stomach turned towards the floor; your hands should be on top of each other and allowing your forehead or chin to rest on them creating a variation of Makarasana – Crocodile pose.
Step 2: You need to flex your feet and curl your toes under. Then bring your heels towards the back wall so that your knees will be lifted off the floor.
Step 3: Time to engage and concentrate; while you are lying, pay attention to your breathing and how it influences the movement of your pelvis: if you are breathing through your diaphragm, you will notice that the pelvic floor moves upwards when you are exhaling and it is synchronized with the movement of the diaphragm. In combination with the previous position, this enables you to become more conscious and engaging.
Step 4: It is important that you keep your awareness at the bottom of your pelvis as you breathe. Sometimes, especially for beginners, it may be hard for you to connect with the movement of the pelvic floor; the goal is to sense the movement of the pelvic floor upward each time you exhale as it tunes with your breath – however, sometimes you may need more time to connect or practice to achieve this goal. When you do this, continue and repeat for 4-6 breaths.
Step 5: Once you do that, you need to relax your legs and feet and turn your head; Then as you lie to rest for 3 to 4 breaths and try to focus on the sensations your body experiences.
Stage 2:
Step 1: Similar to the first stage, you again start with lying down on floor, face down, hands on top of one another and forehead resting on them; the difference now is that now you need to curl your toes under while bringing your heels towards the back wall in order for the knees to come off the floor.
Step 2: Breathing is again crucial: you need to focus on strengthening the pelvic floor by simply imagining pulling the dome of the pelvic floor upwards as you are exhaling, and releasing the pelvic floor muscles while you are inhaling. Make sure that you are relaxed and soften with each inhales while still maintaining the position and keeping the feet curled under and the knees off the floor.
Step 3: You should do this for 4 to 6 breaths, and then, like in the previous stage you need to relax by turning your head on side and moving your hands to side while relaxing your legs; breathing slowly, let go of the muscular engagement and try to note all the sensations occurring in your body.
Step 4: You will need time to adjust; however, once you master contracting and relaxing your pelvic floor muscles, gradually increase the period and hold the lifter longer before relaxing. You still need to let go and relax fully between contractions. You can do it several times, up to 8 or 10, and then give yourself a minute or two for relaxation and noticing your body sensations.
Yoga poses for strengthening your pelvic floor muscles
Savasana Variation Bent legs – Constructive Rest
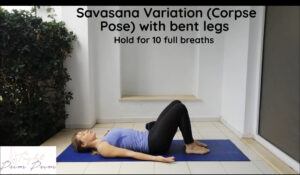
Step 1: lie down on your back; your legs should be wide on the mat, knees together and both of your hands should rest on your belly.
Step 2: Close your eyes and try to concentrate on your breath: become aware of the tune of your breathing by feeling your stomach rise and fall as you breathe in and out. Once in tune, start engaging your abs at the bottom while you are exhaling.
Step 3: While we are breathing (in general not just when practicing yoga) our diaphragm creates and releases pressure in our body while engaging our pelvic floor. By doing this, we are checking on the pressure it has on our pelvic floor muscles.
Marjaryasana and Bitilasana – Cat –cow pose
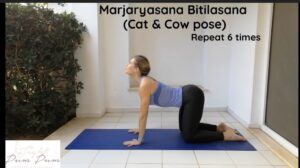
Step 1: Your hands and your knees need to go on the mat directly underneath your shoulders and hips. Your head is between your hands, parallel to the floor.
Step 2: Make sure that your legs are parallel to one another; your hands too. Then, tilt your pelvis forward and bend your spine to cat pose while you are inhaling.
Step 3: slowly try to transition to cow pose by dropping your tailbone first and curving your back as you exhale. It is important that you initiate each movement from the pelvis and your body movement should go in line with your breathing. This pose will bring awareness to specific areas of your pelvis that might be a little painful; nonetheless, if you experience any more difficulties, you should take a break.
Prasarita Padottanasana I – Wide-Legged Forward Fold

Step 1: Start with the mountain pose: the bases of your big toes should be touching while heels should be slightly apart. You should be facing the long edges of your mat as you step your feet apart for 3 – 4 1⁄2 feetapart – this, of course, depends on how tall you are, if you are taller, consider going wider.
Step 2: Start to slowly lower your upper body, keeping your back long and protected. When your torso is parallel to the floor, start pressing your fingertips onto the floor directly below your shoulders. Extend your elbows fully. Your legs and arms then should be perpendicular to the floor and parallel to each other, as your head is down.
Step 4: Breathing is important to focus on as well: you need to inhale as you lift your chest and making sure the front torso is slightly longer than the back and then slowly exhale while maintaining the length of the front torso, and lean it forward from the hip joints.
Step 5: While doing this pose you are opening your hamstrings and groin, which relieves tension in the pelvic floor; that being said, it is really important that you move at your own pace to avoid hurting yourself. If you feel any difficulties or like it is too heavy for you, you can use different props like blankets, pillows, blocks or something similar to give extra support for your head.
Malasana – Birthing Pose or known as Wide-legged squat
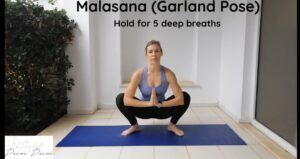
Step 1: This one starts with standing: while you are standing on your feet, bring them on the edges of the mat, toes spilling over if you need.
Step 2: You need to squat down pressing your elbows into your knees, heaving your tailbone and lifting your chest. Your hands need to be placed together, like in praying pose to help you better feel your movement during your breathing.
Step 3: Focus on your breathing and feel the movement of your body as you inhale and exhale. This pose is one of the more challenging ones, so if you are experiencing any pain feel free to stop as you should never try to push through any pain.
Conclusion
Yoga can help to strengthen your pelvic floor muscles. Just like with any other exercise, you need be practice daily and your symptoms will improve. However, it can take few months.
